Frozen Reese's Peanut Butter Pops
Highlighted under: Flour & Frosting Recipes
As a big fan of frozen treats, I created these Frozen Reese's Peanut Butter Pops to combine my love for chocolate and peanut butter on a hot summer day. They’re easy to make and so satisfying that I often find myself reaching for a second one! The secret to their amazing flavor is the perfect balance of creamy peanut butter and silky chocolate, topped off with a sprinkle of crushed peanuts. Trust me, once you make these, you’ll never look at store-bought pops the same way again.
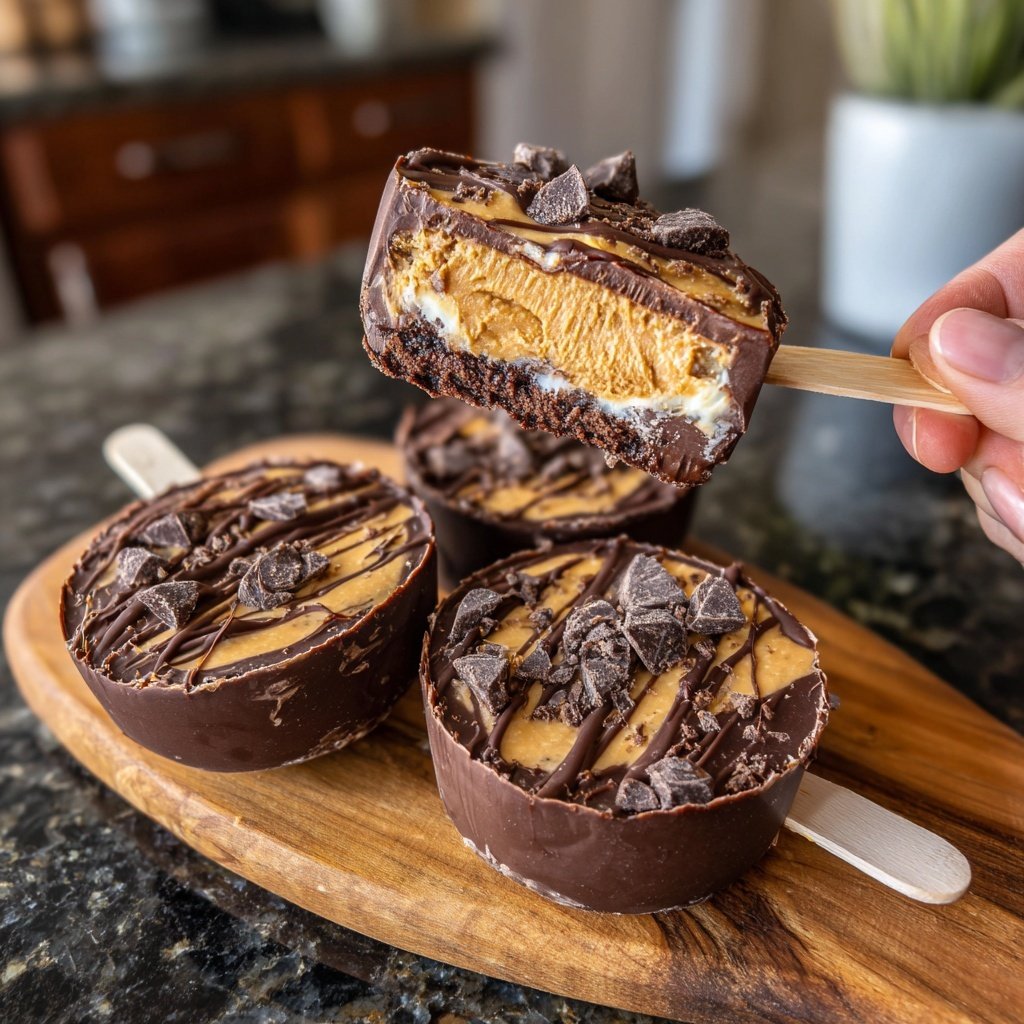
Throughout the summer, I love experimenting with different frozen sweets, and these Frozen Reese's Peanut Butter Pops became an instant favorite. The combination of creamy peanut butter and decadent chocolate is a dream come true. I had to test various ratios until I nailed the perfect mix, and I can confidently say these pops deliver the ultimate indulgence!
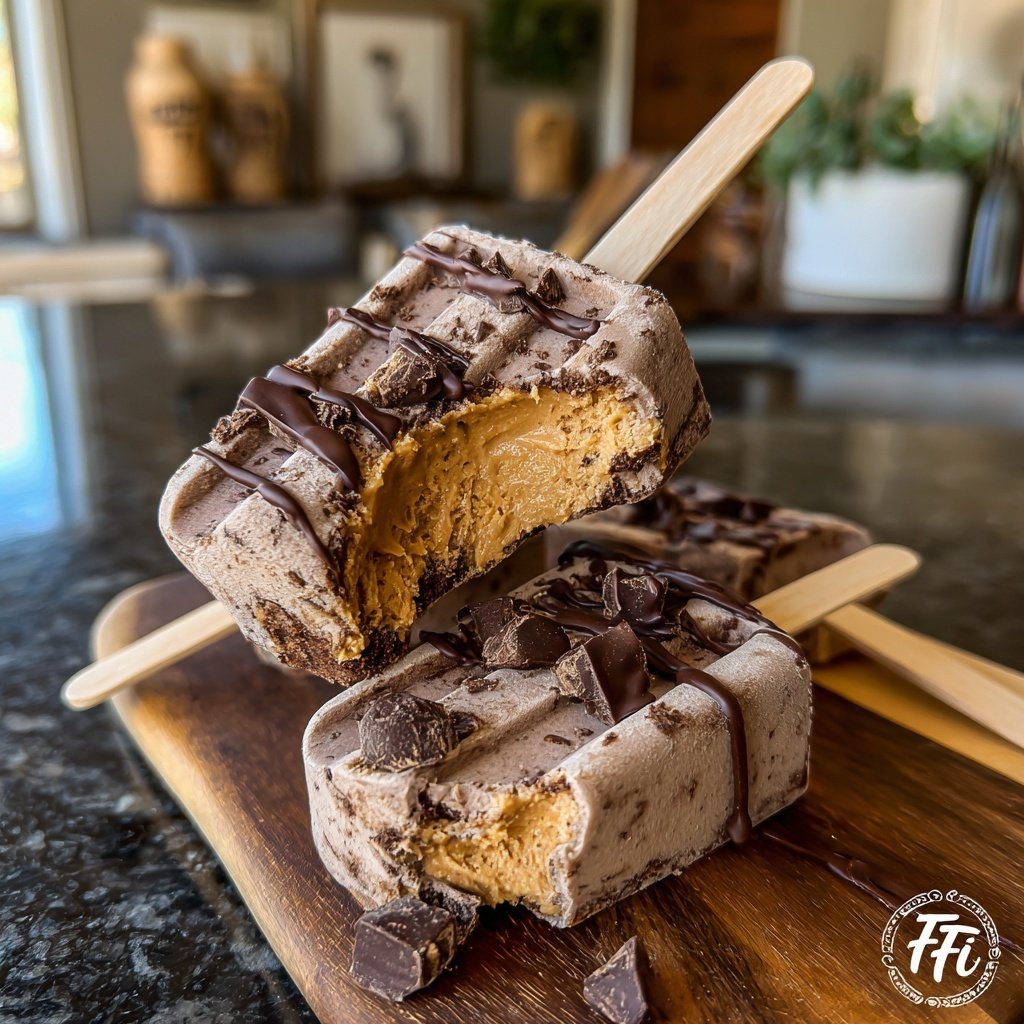
One tip I found useful was to freeze the pops for at least three hours; this ensures that they’re firm enough to hold their shape when you take them out. You’ll be rewarded with perfectly textured pops that melt in your mouth with every bite—simply divine!
Why You'll Love These Pops
- Rich chocolate flavor paired with creamy peanut butter
- Easy to make with just a few ingredients
- Perfectly refreshing for warm days
Mastering the Chocolate Layer
Getting the chocolate layer just right can make or break your Frozen Reese's Peanut Butter Pops. When melting the chocolate chips, ensure you do so in a microwave-safe bowl and cover it with a microwave-safe lid or paper towel to prevent splatters. Microwave in 30-second intervals and stir thoroughly after each interval until it's fully melted and smooth. This technique helps avoid overheating, which can make the chocolate seize up into an unworkable clump.
Once melted, allow the chocolate to cool slightly before pouring it over the peanut butter mixture in the molds. If the chocolate is too hot, it may disrupt the layers, making them mix instead of staying distinct. The ideal consistency for pouring is glossy and slightly thick but still fluid, allowing for an easy coating.
Variations and Flavor Enhancements
Feel free to get creative with these pops! For a twist on flavor, consider adding a pinch of sea salt to the peanut butter mixture for a sweet-salty combo. You can also incorporate mini chocolate chips or even swirl in some caramel sauce for extra depth. If you're a fan of crunchy textures, replacing the crushed peanuts with crushed pretzels can introduce an exciting contrast.
These pops can also be made dairy-free! Simply substitute Greek yogurt with coconut yogurt or a dairy-free alternative. For a chocolate-free version, replace the melted chocolate with a layer of yogurt mixed with cocoa powder to create chocolate yogurt. This not only changes the flavor but also retains the creamy texture that makes these pops so enjoyable.
Storage Tips and Serving Suggestions
Once your Frozen Reese's Peanut Butter Pops are set, you can enjoy them immediately or store them for later. To store, remove the pops from the molds and wrap each one in parchment paper or place them in an airtight container. They can last in the freezer for up to two months. Just remember to label the container with the date, so you know when they were made.
When serving, consider pairing these pops with fresh fruit like banana slices or strawberries for a refreshing contrast. You can also serve them alongside a bowl of melted chocolate for a fun dipping experience. These treats make excellent summer party desserts and can easily be scaled up by doubling the recipe, allowing you to have plenty to share!
Ingredients
Gather the following ingredients to create these delightful pops:
Ingredients
- 1 cup creamy peanut butter
- 1 cup Greek yogurt
- 1/2 cup powdered sugar
- 1 cup chocolate chips
- 1/4 cup crushed peanuts (for topping)
- Popsicle molds and sticks
Once you have all the ingredients, you're ready to start making your pops!
Instructions
Follow these simple steps to prepare your Frozen Reese's Peanut Butter Pops:
Make the Peanut Butter Mixture
In a mixing bowl, combine the creamy peanut butter, Greek yogurt, and powdered sugar. Mix until smooth and well combined.
Fill the Molds
Spoon the peanut butter mixture into your popsicle molds, filling them about three-quarters full.
Melt the Chocolate
In a microwave-safe bowl, melt the chocolate chips in 30-second intervals, stirring each time until fully melted.
Add the Chocolate Layer
Pour the melted chocolate over the filled molds, covering the peanut butter mixture completely.
Insert Sticks and Freeze
Insert popsicle sticks into each mold and freeze for at least 3 hours or until solid.
Serve and Enjoy
Remove the pops from the molds and sprinkle with crushed peanuts before serving. Enjoy your homemade frozen treats!
Now that your pops are ready, enjoy them on a sunny day or whenever you're craving something sweet!
Pro Tips
- For an extra crunch, consider adding crushed pretzels into the peanut butter mixture before freezing.
Choosing the Right Peanut Butter
For the best flavor and texture in your Frozen Reese's Peanut Butter Pops, use a high-quality creamy peanut butter that is fresh and natural. Look for options with minimal ingredients—just peanuts and salt is ideal. Avoid natural peanut butters with oil separation, as they can produce a more runny consistency that might affect the pops' structure while freezing.
If you have nut allergies or want to try a different base, almond butter or sunbutter can be great substitutes. Keep in mind that these alternatives will slightly alter the flavor and may require a taste adjustment in the frosting stage. Always opt for smoother varieties to maintain the pops' creamy texture.
Troubleshooting Common Issues
One common issue when creating pops is unwanted ice crystals forming during freezing, resulting in a gritty texture. To avoid this, ensure that you mix the peanut butter mixture thoroughly to incorporate as much air as possible, which helps create a smoother consistency. Make sure your popsicle molds are airtight, too, as any exposure to air can lead to freezer burn.
If your popsicle sticks don't stay upright during freezing, consider inserting them only after the first layer of chocolate has set. This means pouring just enough melted chocolate to cover the peanut butter mixture, then freezing that layer before adding the sticks. This technique helps secure the sticks in place and keeps the pops looking neat and intact.
Scaling the Recipe
This recipe can be easily scaled up or down to suit your needs. To double the recipe, simply multiply each ingredient by two and use larger molds or additional smaller molds if needed. When scaling down, be cautious with the melting time for chocolate, as smaller chocolate amounts may require slightly less time in the microwave.
If you're short on popsicle molds, consider using ice cube trays for smaller pop sizes. Just be sure to adjust the freezing time accordingly, as these smaller treats will set faster. They make a perfect bite-sized snack for kids and adults alike!
Questions About Recipes
→ How long can I store these pops?
You can store them in the freezer for up to 2 months.
→ Can I use crunchy peanut butter instead?
Absolutely! Crunchy peanut butter will add a delightful texture to the pops.
→ What can I substitute for Greek yogurt?
You can use regular yogurt or even a dairy-free yogurt if you prefer.
→ Can I add other flavors to the pops?
Yes! You can incorporate ingredients like cinnamon or vanilla extract for added flavor.
Frozen Reese's Peanut Butter Pops
Created by: The Yummyvault Team
Recipe Type: Flour & Frosting Recipes
Skill Level: Easy
Final Quantity: 10 pops
What You'll Need
Ingredients
- 1 cup creamy peanut butter
- 1 cup Greek yogurt
- 1/2 cup powdered sugar
- 1 cup chocolate chips
- 1/4 cup crushed peanuts (for topping)
- Popsicle molds and sticks
How-To Steps
In a mixing bowl, combine the creamy peanut butter, Greek yogurt, and powdered sugar. Mix until smooth and well combined.
Spoon the peanut butter mixture into your popsicle molds, filling them about three-quarters full.
In a microwave-safe bowl, melt the chocolate chips in 30-second intervals, stirring each time until fully melted.
Pour the melted chocolate over the filled molds, covering the peanut butter mixture completely.
Insert popsicle sticks into each mold and freeze for at least 3 hours or until solid.
Remove the pops from the molds and sprinkle with crushed peanuts before serving. Enjoy your homemade frozen treats!
Extra Tips
- For an extra crunch, consider adding crushed pretzels into the peanut butter mixture before freezing.
Nutritional Breakdown (Per Serving)
- Calories: 200 kcal
- Total Fat: 12g
- Saturated Fat: 3g
- Cholesterol: 5mg
- Sodium: 50mg
- Total Carbohydrates: 20g
- Dietary Fiber: 2g
- Sugars: 15g
- Protein: 5g