Galentine's Marble Cheesecake Cake
Highlighted under: Flour & Frosting Recipes
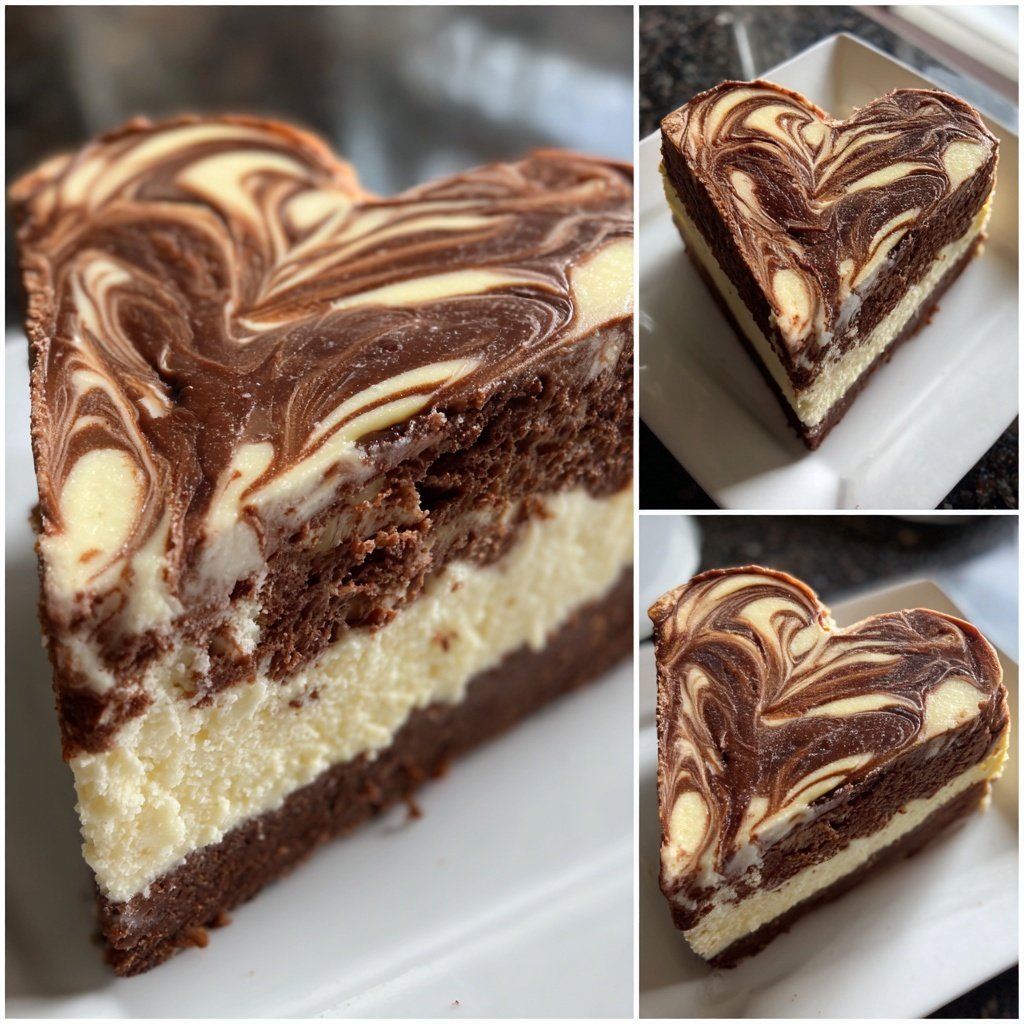
I absolutely adore this Galentine's Marble Cheesecake Cake! From the first slice, the combination of rich cheesecake and fluffy cake layers enchanted my taste buds. The beautiful marbling not only looks stunning but adds delightful bursts of flavor that bring everyone together. Perfect for celebrating friendships, this cake is a total showstopper and can easily be customized with your favorite flavors. I can’t wait to make it for my next gathering—it’s a guaranteed favorite that will have everyone asking for seconds!
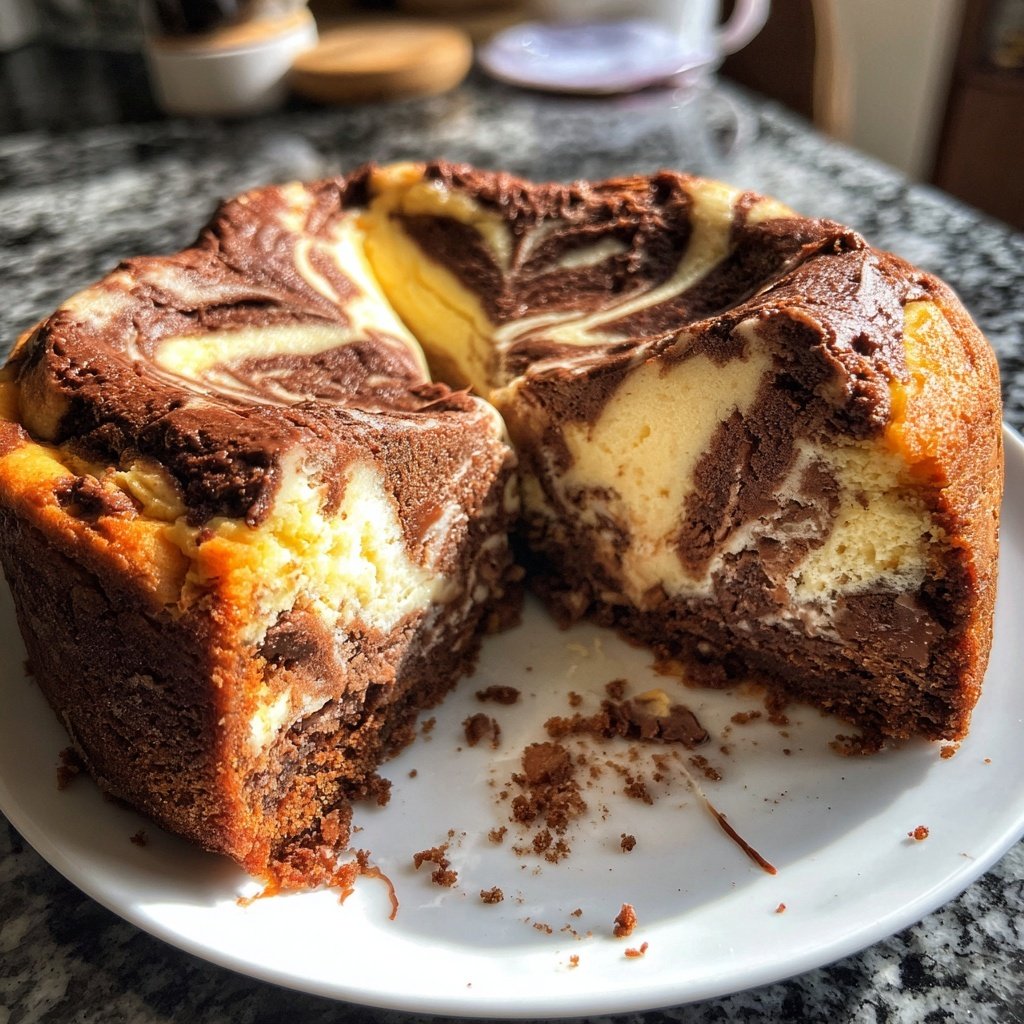
When I first decided to create the Galentine's Marble Cheesecake Cake, I knew I wanted something both striking and endlessly delicious. After several attempts, I found that the balance between rich cream cheese and light vanilla bean cake was just right for me. It's all about the swirling technique; a simple knife swirl creates a beautiful marble pattern while ensuring those iconic flavors blend seamlessly.
One tip I learned while perfecting this cake is to bake it at a lower temperature to avoid cracks in the cheesecake layer. I use room-temperature ingredients, especially the cream cheese, to ensure a smooth batter without lumps. Trust me, this cake is worth every minute spent in the kitchen!
Why You'll Love This Recipe
- Decadent combination of creamy cheesecake and moist cake
- Stunning marbled appearance that impresses at any gathering
- Perfect for celebrating friendships on Galentine's Day
Layering Technique
Achieving the perfect layers in this Galentine's Marble Cheesecake Cake is essential for visual appeal and texture. When you're pouring the cheesecake layer into the springform pan, aim for an even spread across the bottom. This creates a solid base that supports the cake layers while also allowing the marbling technique to shine. Be gentle when spooning on the cake batter to prevent disrupting the cheesecake layer underneath, ensuring clean and distinct layers for a beautiful finished product.
Additionally, when adding the cocoa mixture for the marble effect, it's important to use a light hand. Instead of vigorously swirling, a gentle fold with a knife creates a soft marbling that is visually striking without overwhelming the cheesecake flavor. This balance can be tricky; too much mixing can lead to a homogeneous color instead of the desired elegant ripples. I’ve found that a simple 'S' shape with the knife works wonders for achieving the right aesthetic!
Ingredient Insights
The choice of cream cheese is crucial for the cheesecake layer of this cake. Full-fat cream cheese provides a rich, velvety texture that lighter versions can’t match. When mixing, ensure your cream cheese is at room temperature to avoid lumps; this guarantees a smooth, creamy cheesecake that’s essential for the signature taste and mouthfeel. If you're looking for a lower-fat option, you can substitute with Neufchâtel cheese, but expect a slightly less indulgent flavor profile.
For the cake layer, using unsalted butter allows you to control the salt content, enhancing the overall sweetness without overwhelming the palate. If you're in a bind, vegetable oil can serve as a substitute for butter, keeping the cake moist, but it will alter the taste slightly. Additionally, consider using whole milk instead of low-fat or skim, as this adds to the moistness and density of the cake—a key feature that complements the creamy cheesecake layer.
Storage and Make-Ahead Tips
This Galentine's Marble Cheesecake Cake can be made ahead of time, making it a convenient option for gatherings. After baking and cooling, you can cover the cake tightly with plastic wrap and refrigerate it for up to 4 days. This not only makes it easy to prepare in advance but also allows the flavors to meld beautifully, enhancing the overall taste of the cheesecake. For longer storage, consider freezing the cake. Just ensure it’s fully cooled and wrapped well to prevent freezer burn. You can freeze it for up to 2 months, and it will still maintain its delicious flavors.
When it comes time to serve, thaw the cake in the refrigerator for several hours or overnight for the best results. If you're worried about serving it after freezing, consider an option to garnish with fresh berries or a drizzle of chocolate sauce just before serving. This not only adds freshness but also complements the deep chocolate notes in the marbling beautifully. Enjoy the enhanced flavors while impressing your friends with a stunning presentation!
Ingredients
Ingredients
For the Cheesecake Layer
- 16 oz cream cheese, softened
- 1 cup sugar
- 2 large eggs
- 1 teaspoon vanilla extract
- 1/4 cup sour cream
For the Cake Layer
- 1 1/2 cups all-purpose flour
- 1 cup sugar
- 1/2 cup unsalted butter, softened
- 2 large eggs
- 1 teaspoon vanilla extract
- 1/2 cup milk
- 1 1/2 teaspoons baking powder
For the Marble Effect
- 1/4 cup cocoa powder
- 1/4 cup hot water
Equipment Needed
- 9-inch springform pan
- Mixing bowls
- Electric mixer
- Spatula
Instructions
Instructions
Prepare the Cheesecake Layer
In a mixing bowl, beat the softened cream cheese and sugar until smooth. Add eggs one by one, beating well after each addition. Mix in the vanilla and sour cream until combined. Pour this mixture into a greased 9-inch springform pan and set aside.
Prepare the Cake Batter
In another bowl, cream the butter and sugar together until light and fluffy. Add the eggs one at a time, followed by vanilla and milk. In a separate bowl, whisk the flour and baking powder together. Gradually mix the dry ingredients into the wet mixture until just combined.
Create the Marble Effect
In a small bowl, mix cocoa powder with hot water until smooth. Pour 3/4 of the cake batter over the cheesecake layer. Spoon dollops of the cocoa mixture on top, and use a knife to create a marbling effect by swirling gently. Pour the remaining cake batter over the top.
Bake the Cake
Preheat the oven to 325°F (163°C). Bake for 50 minutes or until the edges are firm and the center slightly jiggles. Turn off the oven, crack the door, and let the cake cool for an hour before removing it from the pan.
Serve and Enjoy
Once cooled, refrigerate the cake for at least 4 hours before slicing. Serve chilled and watch as your friends delight in the luscious flavors!
Serving Suggestions
Consider topping the cheesecake cake with fresh berries or a chocolate drizzle for an extra touch.
Pro Tips
- To prevent cracking in the cheesecake layer, ensure all ingredients are at room temperature before mixing.
Flavor Variations
One of the best things about this Galentine's Marble Cheesecake Cake is its versatility. You can easily customize the flavors based on your preference or seasonal ingredients. Try swapping the cocoa powder for matcha for a vibrant green color, or experiment with fruit purees such as raspberry or strawberry mixed into the cheesecake layer for a fruity twist. Just be cautious with the moisture content—adding too much liquid can affect the texture of the cheesecake layer.
Additionally, if you want to add a touch of zest, consider incorporating lemon or orange zest into the cheesecake batter. This not only enhances the flavor but also adds a refreshing brightness that contrasts with the chocolate cake layer beautifully. Keep the zest quantity to about one tablespoon to avoid overpowering the other flavors.
Troubleshooting Common Issues
If your cheesecake cracks during baking, this can often be attributed to rapid temperature changes or overmixing the batter. To prevent cracks, make sure to bake the cake at a steady and lower temperature, as specified (325°F), and avoid opening the oven door too frequently while baking. If cracks do form, don’t worry! A layer of chocolate ganache or a simple dusting of powdered sugar can make for a lovely disguise while adding to the dessert's overall flavor.
Another common issue could be the density of the cake layer. If it turns out too dense, check that you properly mixed the wet and dry ingredients; overmixing can incorporate too much air, resulting in a less tender crumb. To remedy this, always mix until just combined. A light touch is key to ensuring a fluffy, moist cake that perfectly complements the rich cheesecake.
Questions About Recipes
→ Can I use a different flavor for the cake?
Absolutely! You can substitute vanilla extract with almond or lemon for a unique twist.
→ How should I store leftover cheesecake cake?
Keep it covered in the refrigerator for up to one week. You can also freeze slices for longer storage.
→ Is it necessary to use a springform pan?
While it's recommended for easy removal, you can use a regular cake pan lined with parchment paper.
→ Can I make this cake gluten-free?
Yes, just swap all-purpose flour with a gluten-free baking mix for a suitable alternative.
Galentine's Marble Cheesecake Cake
Created by: The Yummyvault Team
Recipe Type: Flour & Frosting Recipes
Skill Level: Intermediate
Final Quantity: 12 servings
What You'll Need
For the Cheesecake Layer
- 16 oz cream cheese, softened
- 1 cup sugar
- 2 large eggs
- 1 teaspoon vanilla extract
- 1/4 cup sour cream
For the Cake Layer
- 1 1/2 cups all-purpose flour
- 1 cup sugar
- 1/2 cup unsalted butter, softened
- 2 large eggs
- 1 teaspoon vanilla extract
- 1/2 cup milk
- 1 1/2 teaspoons baking powder
For the Marble Effect
- 1/4 cup cocoa powder
- 1/4 cup hot water
How-To Steps
In a mixing bowl, beat the softened cream cheese and sugar until smooth. Add eggs one by one, beating well after each addition. Mix in the vanilla and sour cream until combined. Pour this mixture into a greased 9-inch springform pan and set aside.
In another bowl, cream the butter and sugar together until light and fluffy. Add the eggs one at a time, followed by vanilla and milk. In a separate bowl, whisk the flour and baking powder together. Gradually mix the dry ingredients into the wet mixture until just combined.
In a small bowl, mix cocoa powder with hot water until smooth. Pour 3/4 of the cake batter over the cheesecake layer. Spoon dollops of the cocoa mixture on top, and use a knife to create a marbling effect by swirling gently. Pour the remaining cake batter over the top.
Preheat the oven to 325°F (163°C). Bake for 50 minutes or until the edges are firm and the center slightly jiggles. Turn off the oven, crack the door, and let the cake cool for an hour before removing it from the pan.
Once cooled, refrigerate the cake for at least 4 hours before slicing. Serve chilled and watch as your friends delight in the luscious flavors!
Extra Tips
- To prevent cracking in the cheesecake layer, ensure all ingredients are at room temperature before mixing.
Nutritional Breakdown (Per Serving)
- Calories: 380 kcal
- Total Fat: 26g
- Saturated Fat: 15g
- Cholesterol: 195mg
- Sodium: 85mg
- Total Carbohydrates: 32g
- Dietary Fiber: 3g
- Sugars: 24g
- Protein: 6g